Showing posts with label congnghe. Show all posts

Saturday, 4 December 2021

677.0 Hướng dẫn sửa lổi không thể kết nối L2TP/IPSEC trên windows /Configuring L2TP/IPSec VPN Connection Behind a NAT, VPN Error Code 809

 Nguồn: http://woshub.com/l2tp-ipsec-vpn-server-behind/


Configuring L2TP/IPSec VPN Connection Behind a NAT, VPN Error Code 809

Due to disabling PPTP VPN support in iOS, one of my clients decided to reconfigure the VPN server running Windows Server 2012 R2 from PPTP to L2TP/IPSec. Internal VPN clients from inside LAN connect to the VPN server without any problems, however external Windows clients get the error 809 when trying to establish the connection with the L2TP VPN server:

Can’t connect to L2TP-IPsec-VPN-Server.hostname

The network connection between your computer and the VPN server could not be established because the remote server is not responding. This could be because one of the network devices (e.g. firewalls, NAT, routers, etc) between your computer and the remote server is not configured to allow VPN connections. Please contact your Administrator or your service provider to determine which device may be causing the problem.

Can’t connect to L2TP-IPsec-VPN-Server

In other Windows versions, the connection errors 800, 794 or 809 may indicate the same problem.

It is worth to note that the VPN server is behind a NAT, and the router is configured to forward L2TP ports:

  • UDP 1701 — Layer 2 Forwarding Protocol (L2F) & Layer 2 Tunneling Protocol (L2TP)
  • UDP 500
  • UDP 4500 NAT-T – IPSec Network Address Translator Traversal
  • Protocol 50 ESP

These ports are also open in the Windows Firewall rules for VPN connection. Those, the classic configuration is used. The built-in Windows VPN client is used for connection.

If you connect to the same VPN server via PPTP, the connection is successfully established.

VPN Error 809 for L2TP/IPSec on Windows behind NAT

As it turned out, the problem is already known and described in the article https://support.microsoft.com/en-us/kb/926179. The Windows built-in VPN client doesn’t support by default L2TP/IPsec connections through NAT. This is because IPsec uses ESP (Encapsulating Security Payload) to encrypt packets, and ESP doesn’t support PAT (Port Address Translation). If you want to use IPSec for communication, Microsoft recommends using public IP addresses on the VPN server.

But there is also a workaround. You can fix this drawback by enabling support for the NAT-T protocol, which allows you to encapsulate ESP 50 packets in UDP packets on port 4500. NAT-T is enabled by default in almost all operating systems (iOS, Android, Linux) except Windows.

If the L2TP/IPsec VPN server is behind a NAT device, in order to connect external clients through NAT correctly, you have to make some changes to the registry both on the server and client side to allow UDP packet encapsulation for L2TP and NAT-T support in IPsec.

  • Open the Registry Editor (regedit.exe) and go to the following registry key:
    • Windows 10/8.1/Vista  and Windows Server 2016/2012R2/2008R2 — HKEY_LOCAL_MACHINE\SYSTEM\CurrentControlSet\Services\PolicyAgent
    • Windows XP/Windows Server 2003 — HKEY_LOCAL_MACHINE\SYSTEM\CurrentControlSet\Services\IPSec
  • Create a DWORD parameter with the name AssumeUDPEncapsulationContextOnSendRule and the value 2;AssumeUDPEncapsulationContextOnSendRule registry key
    Note. Possible AssumeUDPEncapsulationContextOnSendRule values are:
    • 0 – (a default value) suggests that the server is connected to the Internet without NAT;
    • 1 – the VPN server is behind a NAT device ;
    • 2 — both VPN server and client are behind a NAT.
  • Just restart your computer and make sure that the VPN tunnel is established successfully
[alert] If both Windows VPN server and client are behind NAT, you need to change this setting on both devices.

Also, you can use a PowerShell cmdlet to make changes to the registry:

Set-ItemProperty -Path "HKLM:SYSTEM\CurrentControlSet\Services\PolicyAgent" -Name "AssumeUDPEncapsulationContextOnSendRule" -Type DWORD -Value 2 –Force;

After enabling NAT-T support, you will be able to successfully connect to the VPN server from the client through NAT (including double NAT).

In some cases, for VPN to work properly, you need to enable an additional firewall rule for TCP 1701 (in some L2TP implementations, this port is used in conjunction with UDP 1701).
NAT-T didn’t work correctly in earlier Windows 10 builds, for example, 10240, 1511, 1607. If you have an older Windows version, we recommend you to upgrade the Windows 10 build.

Multiple L2TP VPN Connections from the same LAN

There is another interesting VPN bug. If your local network has several Windows computers, you cannot establish more than one simultaneous connection to an external L2TP/IPSec VPN server. If you try to connect to the same VPN server from another computer (with an active VPN tunnel from different device), error code 809 or 789 will appear:

Error 789: The L2TP connection attempt failed because the security layer encountered a processing error during initial negotiations with the remove computer.
Interestingly, this problem only occurs on Windows devices. On Linux/MacOS/Android devices on the same local network, there are no such problems. You can easily connect to the VPN L2TP server from multiple devices at the same time.

According to TechNet, the issue is related to incorrect implementation of the L2TP/IPSec client on Windows (not fixed for many years).

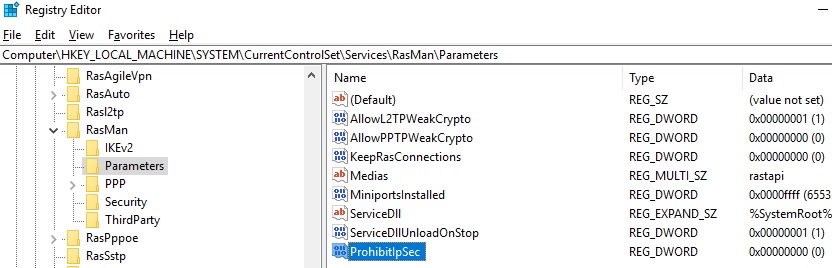
To fix this bug, you need to change two registry parameters in the HKEY_LOCAL_MACHINE\SYSTEM\CurrentControlSet\Services\RasMan\Parameters registry key and restart your computer:

  • AllowL2TPWeakCrypto – change to 00000001 (allows weak encryption algorithms, for L2TP/IPSec the MD5 and DES algorithms are used);
  • ProhibitIPSec – change to 00000000 (enables IPsec encryption, which is often disabled by some VPN clients or system tools).

AllowL2TPWeakCrypto and ProhibitIpSec for l2tp ipsec vpn connection behind a NAT on Windows

Run the following command to change apply these registry changes:

reg add "HKEY_LOCAL_MACHINE\System\CurrentControlSet\Services\Rasman\Parameters" /v AllowL2TPWeakCrypto /t REG_DWORD /d 1 /f
reg add "HKEY_LOCAL_MACHINE\System\CurrentControlSet\Services\Rasman\Parameters" /v ProhibitIpSec /t REG_DWORD /d 0 /f

This enables support for concurrent L2TP/IPSec VPN connections on Windows through a shared public IP address (works on all versions from Windows XP to Windows 10). 


Friday, 26 February 2021

675.0 Cách chặn quảng cáo trên Facebook giao điện mới ( Block Facebook Ads on new GUI)


FB giao diện mới giờ họ quảng cáo ghê quá, phải nói là kiểu dội bom ấy! Cho nên không còn cách nào khác, dành phải thêm filter và lọc bớt vậy !
Copy filter bên dưới, thêm vào các add-in phổ biến như Adblock, adblock plus, Adguard, uBlock Origin... etc
 
facebook.com##div[role="feed"] > div[data-pagelet^="FeedUnit"] div > span > span > a > span:upward(div[data-pagelet^="FeedUnit"])

--Nếu bộ lộc trên không thể hoạt động, thêm 2 bộ lọc bên dưới. Reason xem chi tiết remark

facebook.com###facebook div[role="feed"] div > span > span > a > span > span[aria-label="Sponsored"]:upward(div[role="feed"] > div)

facebook.com###facebook div[role="feed"] div > span > span > a > span[aria-label="Sponsored"]:upward(div[role="feed"] > div)
 
Nguồn:  https://www.reddit.com/r/uBlockOrigin/comments/ko5s8c/fuck_facebook_heres_how_to_block_new_ads/
 

Add this to your filters

facebook.com##div[data-pagelet^="FeedUnit"]:has(a:has-text(/^S[a-zA-Z0-9]*p[a-zA-Z0-9]*o[a-zA-Z0-9]*n[a-zA-Z0-9]*s[a-zA-Z0-9]*o[a-zA-Z0-9]*r[a-zA-Z0-9]*e[a-zA-Z0-9]*d/))

you can't use has-text(Sponsored) because facebook purposefully adds random characters to obfuscate the word "Sponsored" like

tl1tfSp5honsoresd
tSnhSppoonncscsrornomgeedrded
98% Upvoted
Log in or sign up to leave a commentLog InSign Up
Sort by
level 1

Try the rule below for the redesigned FB. This rule does not look for the word "Sponsored", it looks for a particular HTML structure that Sponsored posts have. This rule only works in the News Feed page only. ATM, this rule works quite well:

facebook.com##div[role="feed"] > div[data-pagelet^="FeedUnit"] div > span > span > a > span:upward(div[data-pagelet^="FeedUnit"])


If that doesn't work on the redesigned FB, then try the following two rules. The reason the above rule isn't working for some users is because FB might be serving a different version of the HTML code based on your region/language or some other reason. The following rules look for a certain attribute having the word "Sponsored", but must be in a certain HTML structure:

facebook.com###facebook div[role="feed"] div > span > span > a > span > span[aria-label="Sponsored"]:upward(div[role="feed"] > div)

facebook.com###facebook div[role="feed"] div > span > span > a > span[aria-label="Sponsored"]:upward(div[role="feed"] > div)


Saturday, 31 August 2019

671.0 Hướng dẫn cài đặt SQL Server 2019 trên Windows

Hướng dẫn cài đặt SQL Server 2019 trên Windows

SQL Server 2019 installation on Windows

We can install SQL Server 2019 on Windows, Linux, Docker containers and Big data analytics container images with Kubermetes. Go to SQL Server 2019 and we get below download options
Install SQL Server 2019 options on differnt environments
In this article, we are going to install SQL Server 2019 on windows so click on windows and it now opens a screen with only windows operation system set up.
Install SQL Server 2019 on WIndows system
Click on ‘Preview SQL Server 2019 for Windows’ and it lands on the product family page. We need to provide basic details like Name, Company name, email address, contact number, and country name.
Provide basic details to download set up of SQL Server 2019
Once you provide details, click on ‘Continue’ and it starts the download.Download SQL Server VNext 2.0 Set up
Once the download is complete, click on SQLServerVNext-SSEI-Eval.exe file and you get below options for the installation of SQL 2019.
It gives three options to choose:
  1. Basic: To install the database engine with default settings.
  2. Custom: in this option, we will go through the installation steps and configure SQL Server as per our requirement.
  3. Download Media: If we just want to download the set up, choose this option. We can choose ISO\CAB format to download.
SQL Server vNext CTP2.0 installation type
Let us choose the Custom mode for the installation. Once you click on the custom mode, it asks for the SQL Server media download target location. This path should have sufficient free space to download media.
SQL Server vNext CTP2.0 installation media location
Click on Install to move further. It downloads the media and starts the installation.
Download progress for SQL Server vNext CTP2.0 installation media
While the download is in progress, we can a few messages to give us some important information.
  • SQL SERVER 2019 CTP 2.0 is also available for Linux. To obtain the Linux 2.0 images, including containers, please see here.
SQL Server vNext CTP2.0 installation media download and messages
Once SQL Server CTP 2.0 media download is complete, it extracts the setup files to start the installation.
SQL Server vNext CTP2.0 installation media download and messages
We need to wait while SQL Server vNext CTP 2.0 set up process the current operation.
SQL Server vNext CTP installation progress message
It launches the SQL Server installer page that contains links for below pages:
  • Planning: for SQL Server documentation, release notes, upgrade documentation etc.
  • Installation: Install SQL Server services on stand-alone and cluster instance; install SQL Server Reporting service, Management tools, data tools etc.
  • Maintenance: Edition upgrade, repair, remove a node from clusters.
  • Tools: System configuration checker, SQL Server feature discovery report, Microsoft Assessment and Planning Toolkit
  • Resources: SQL Server resources, books online, license agreement, privacy statement.
  • Advanced: install SQL Server on the configuration file, advanced cluster preparation, image preparation and completion of the standalone instance
  • Option: Specify architecture (x64 or x86) and installation media root directory.
SQL Server Installation Center and its options
Click on Installation page and then on ‘New SQL Server stand-alone installation or add features to an existing installation’
SQL Server Installation Center - option to install SQL Server on Standalone system
Since we are installation evaluation edition of SQL Server vNext CTP2.0, we will move will default option ‘Evaluation’ and click Next
Specify edition in SQL Server Installation Center
Accept the license terms and conditions. Please note the message written here that SQL Server
Transmits information about installation experience in performance data to Microsoft to help improve the product.
SQL Server Installation Center accept license terms
Click on Next. In the next page, it checks for the Global rules and give status information about successful, failed rules. If there are any failed rules, we need to fix those before proceeding with the installation.
Global Rules in SQL Server vNext CTP2.0 Setup
In the next step, it downloads the setup files. If SQL Server installation is already there on the server, it might skip the steps.
Install Set up files in SQL Server vNext CTP2.0
In the next screen, it checks for setting up rules that might cause issues in the SQL Server installation. We can see the warning message against the Windows Firewall but it can be ignored. Click next to move further.
Install Rules SQL Server vNext CTP2.0
Now we need to select the features, we need to install with this installation. We can a new option ‘Java connector for HDFS data sources’ as compared with SQL Server 2017 installation.
Feature selection in SQL Server vNext CTP 2.0
You can choose to install a default or named instance name. If a default instance is already present on the machine, we can only install named instance. Provide an appropriate name for the named instance. For example, I specified SQL 2019.
Instance Configuration to select default or named instance
In the next page, Server configuration, you can specify service account to use for SQL Server services along with the Collation. In this article, let us move with default service account and collation. We can change service accounts later from SQL Server configuration managerSpecifu service account for SQL Services
If we want to change the collation, click on customize and choose the required collation. We need to be cautious while changing Collation.
specify and customize SQL Server Collation
Specify Authentication modes (Windows or Mixed mode) and add users to have SQL Server administrators.
Select Authentication modes and administrators
Click on Data Directories and we can specify the data, log files, backup directories here.
Specify Data Directories for database files, log files and backups
Click on TempDB to configure the TempDB configurations. We will move with the default configuration suggested by the installer.
Specify Data Directories for TempDB database files, log files
If we want to enable Filestream, enable this option else to leave and click on Next.
Enable FileStream in SQL Server vNext CTP 2.0
We get an overview of the SQL Server configurations from the Ready to install page. Review the information and click on next to start the installation process.
Verify the Configuration before starting setup
Once the installation is completed, launch SSMS 18.0 preview to connect with SQL Server.

Download and install SSMS Release 18 Preview 4

We need to install SSMS 18.0 preview 4 to connect to SQL Server 2019 and explore full features. To install SSMS 18.0 preview. Download from link.
Download SSMS 18.0 Preview for connecting to SQL Server
Download the SSMS release 18.0 preview 4 and start the installation. It just completes without any user input.
Install SSMS 18.0 Preview 4
It gives below message to restart the system to complete setup.
Restart Server after installation of SSMS 18.0 release 18.0 preview 4
Now launch SSMS and connect to SQL Server to check the version and edition details.
Launch SSMS to connect with SQL Server 2019
Connect to the instance and right click ->properties
View Database instance properties
We can check the edition, product version and ProductLevel from query as well as shown below.
Database instance properties from t-SQL

Conclusion

SQL Server 2019 looks promising to deliver the next generation of SQL Server with many new features, enhancements, integration with big data clusters, AI enabled relational database engine. Keep exploring new features to get pace with Microsoft new release.
Tagged:

Tuesday, 7 May 2019

669.0 Cách thêm SSL certificate cho Mdaemon

Bước 1: Copy 2 files cert được gửi cho bạn và tải lên server (gồm 2 files certificate.crt và intermediate.cer), đặt trong thư mục C:\
Bước 2: Remote vào server và tiến hành cài đặt Intermediate CA:
– Mở một MMC. Nhấn Start > Run… và gõ vào mmc. Nhấn OK.
– Từ menu của màn hình Microsoft Management Console (MMC), chọn mục File > Add/Remove Snap-in. Nhấn Add
– Từ danh sách snap-ins, chọn Certificates. Nhấn Add. Chọn Computer account. Nhấn Next. Chọn Local computer. Nhấn Finish. Nhấn Close. Nhấn OK
– Trong khung bên trái, nhấn chọn mục Intermediate Certification Authorities. Nhấp chuột phải vào Certificates, chọn All Tasks > Import. Trong màn hình Certificate Import, nhấn Next. Tới đây chọn đường dẫn đến file intermediate.cer trên Desktop và nhấn Next. Chọn mục “Place all certificate in the following store: Intermediate Certification Authorities”. Nhấn Next. Nhấn Finish.
Bước 3: Cài đặt chứng thư số vào Mdaemon
Từ màn hình máy chủ, mở một command prompt, chuyển vào thư mục gốc ổ đĩa C:\ và chạy lệnh sau:
certreq -accept C:\certificate.crt
Bước 4: Kích hoạt SSL cho MDaemon
  1. Từ màn hình quản trị MDaemon, chọn Security > SSL/TLS/Certificates
  2. Trong màn hình SSL & Certificates, chọn tab Email SSL hoặc MDaemon. Trong mục SSL options nhấp chọn:
* Enable SSL, STARTTLS, STLS supports for SMTP, IMAP, POP servers
* Enable the dedicated SSL ports for SMTP, IMAP, POP servers
* Send messages using STARTTLS whenever possible
Trong mục Select certificate, chọn chứng thư số mà bạn vừa cài đặt trước đó. Sau đó nhấn nút Apply để cập nhật chứng thư số cho MDaemon.
Nhấn Restart servers để MDaemon reload lại thông số.
  1. Chuyển sang tab WorldClient. Trong mục SSL options nhấp chọn:
Enable SSL
Nếu bạn muốn MDaemon chỉ chấp nhận các kết nối HTTPS vào WorldClient, bạn nhấp chọn mục:
Require SSL
Sau đó chọn port phù hợp cho WorldClient (443).
Trong mục Select certificate, chọn chứng thư số mà bạn vừa cài đặt trước đó. Sau đó nhấn nút Apply để cập nhật chứng thư số cho MDaemon.
Nhấn Restart servers để MDaemon reload lại thông số.
  1. Chuyển sang tab WebAdmin. Trong mục SSL options nhấp chọn:
Enable SSL
Nếu bạn muốn MDaemon chỉ chấp nhận các kết nối HTTPS vào WebAdmin, bạn nhấp chọn mục:
Require SSL
Sau đó chọn port phù hợp cho WebAdmin (8443). Lưu ý: Bạn không thể chọn cùng một port cho cả WorldClient lẫn WebAdmin.
Trong mục Select certificate, chọn chứng thư số mà bạn vừa cài đặt trước đó. Sau đó nhấn nút Apply để cập nhật chứng thư số cho MDaemon.
Nhấn Restart servers để MDaemon reload lại thông số.

Saturday, 24 March 2018

666. Hướng dẫn sửa lỗi phát WiFi với "Thánh SIM" của Vietnamobile

Nguồn: Internet: 

Hạn chế của "Thánh SIM" là người dùng gặp lỗi khi phát WiFi từ 3G trên điện thoại, điều này làm suy giảm đáng kể giá trị sử dụng của SIM ưu đãi dữ liệu khủng Vietnamobile này trong mắt người dùng.
"Thánh SIM" là một loại SIM mà Vietnamobile tung ra thị trường và tạo ra sức hút không nhỏ trong thời gian gần đây với các ưu đãi khủng nhất là về dữ liệu 3G. Ví dụ khi mua "Thánh SIM" thì người dùng chỉ mất 40.000 đồng nhưng được miễn phí không giới hạn 3G trong 30 ngày, đồng thời miễn phí 3G trong 6 tháng nếu mỗi tháng nạp thêm 20.000.
Mặc dù vậy hạn chế của "Thánh SIM" là người dùng gặp lỗi khi phát WiFi từ 3G trên điện thoại dùng SIM này (xem hướng dẫn phát WiFi từ điện thoại cơ bản ở đây), điều này làm suy giảm đáng kể giá trị sử dụng của "Thánh SIM" trong mắt người dùng.
Lỗi đa phần người dùng gặp phải khi phát WiFi từ 3G trên điện thoại dùng "Thánh SIM" sẽ giống như trong hình.

Hướng dẫn sửa lỗi phát WiFi với "Thánh SIM" của Vietnamobile

Đến nay đã có chia sẻ về cách để phát được WiFi từ 3G trên iPhone khi sử dụng "Thánh SIM". Theo đó đầu tiên chúng ta vào Cài đặt > Di động > Tùy chọn dữ liệu di động > Mạng dữ liệu di động.
Đến nay đã có chia sẻ về cách để phát được WiFi từ 3G trên các thiết bị iOS khi sử dụng "Thánh SIM". Theo đó đầu tiên chúng ta vào Cài đặt > Di động > Tùy chọn dữ liệu di động > Mạng dữ liệu di động.

Ở đây, bạn hãy kéo xuống dưới cùng và lựa chọn chỗ APN ở phần Điểm truy cập cá nhân. Sau đó hãy nhập từ "internet".
Vậy là chúng ta đã có thể tiến hành phát WiFi từ 3G bằng cách nhấn vào Điểm truy cập cá nhân.

Monday, 28 November 2016

664. 8 "tinh chỉnh" Windows Group Policy bất kỳ Admin nào cũng nên biết ( CẤM SỬ DỤNG USB)

Windows Group Policy là công cụ khá mạnh được sử dụng để cấu hình nhiều khía cạnh của Windows. Hầu hết việc tinh chỉnh Windows Group Policy chỉ có Admin mới có thể thực hiện được. Nếu bạn là Admin của nhiều máy tính khác trong công ty hoặc bạn có nhiều tài khoản khác trên máy tính của mình, khi đó bạn nên tận dụng lợi thế của Windows Group Policy để kiểm soát việc sử dụng máy tính của người dùng khác.
Tinh chỉnh Windows Group Policy
Lưu ý:
Group Policy Editor không có sẵn trên phiên bản Home và phiên bản chuẩn của Windows. Bạn phải sử dụng phiên bản Professional hoặc Enterprise thì mới có thể sử dụng Group Policy.

Làm thế nào để truy cập Windows Group Policy Editor?

Mặc dù có nhiều cách để truy cập Windows Group Policy Editor, nhưng cách đơn giản nhất và nhanh nhất là sử dụng hộp thoại Run và cách này hoạt động tất cả phiên bản của Windows.
Để truy cập Windows Group Policy Editor bạn thực hiện theo các bước dưới đây:
Nhấn tổ hợp phím Windows + R để mở cửa sổ lệnh Run, sau đó nhập "gpedit.msc" vào đó rồi nhấn Enter để mở Group Policy Editor.
Cách để truy cập Windows Group Policy Editor
Một lưu ý là bạn phải đăng nhập bằng tài khoản Admin trước khi truy cập Group Policy. Tài khoản chuẩn không cho phép truy cập Group Policy.

1. Theo dõi đăng nhập tài khoản

Trên Group Policy bạn có thể "buộc" Windows "ghi lại" tất cả các đăng nhập thành công và thất bại trên máy tính từ bất kỳ tài khoản người dùng nào. Bạn có thể sử dụng các thông tin này để theo dõi xem có người lạ nào đăng nhập trái phép máy tính Windows của bạn hay không.
Trên cửa sổ Group Policy Editor, bạn điều hướng theo đường dẫn dưới đây:
Computer Configuration => Windows Settings => Security Settings => Local Policies => Audit Policy
Sau đó tìm và kích đúp chuột vào Audit logon events.
Lúc này trên màn hình xuất hiện hộp thoại Audit logon events Properties. Tại đây bạn đánh tích chọn SuccessFailure, sau đó click chọn OK và Windows sẽ bắt đầu "ghi lại" các đăng nhập được thực hiện trên máy tính của bạn.
Audit logon events Properties
Để xem các đăng nhập này bạn phải truy cập công cụ hữu ích khác của Windows - Windows Event Viewer. Để mở Windows Event Viewer, đầu tiên bạn nhấn tổ hợp phím Windows + R để mở cửa sổ lệnh Run, sau đó nhập eventvwr vào đó rồi nhấn Enter.
Tại đây bạn mở rộng mục Windows Logs, sau đó chọn tùy chọn Security. Tại khung ở giữa bạn sẽ nhìn thấy tất cả các sự kiện gần đây, nhiệm vụ của bạn là chỉ cần tìm các sự kiện đăng nhập thành công và thất bị tại danh sách này.
Các sự kiện đăng nhập thành công có "Event ID: 4624" và đăng nhập thất bại là "Event ID: 4625". Chỉ cần tìm các ID sự kiện để tìm các thông tin đăng nhập và xem chính xác ngày và thời gian đăng nhập.
Các sự kiện đăng nhập thành công
Kích đúp chuột vào các sự kiện này để hiển thị chi tiết tên tài khoản đăng nhập.

2. Chặn truy cập Control Panel

Control Panel được xem là “trung tâm” các thiết lập của Windows, bao gồm cả thiết lập bảo mật và thiết lập sử dụng. Tuy nhiên nếu bị rơi vào tay kẻ xấu bạn sẽ không thể đoán trước được điều gì sẽ xảy ra. Để ngăn chặn các trường hợp xấu có thể xảy ra, tốt nhất bạn nên chặn quyền truy cập Control Panel.
Để làm được điều này, trên cửa sổ Group Policy Editor bạn điều hướng theo key:
User Configuration => Administrative Templates => Control Panel
Chặn quyền truy cập Control Panel
Tại đây tìm và kích đúp vào tùy chọn có tên "Prohibit access to the Control Panel".
Trên cửa sổ Prohibit access to the Control Panel, click chọn tùy chọn Enable để chặn truy cập Control Panel. Bây giờ tùy chọn Control Panel sẽ được gỡ bỏ khỏi Start Menu và không một ai có thể truy cập Control Panel được nữa, thậm chí ngay cả khi mở Control Panel trên cửa sổ lệnh Run.
Prohibit access to the Control Panel
Nếu cố gắng mở Control Panel, trên màn hình sẽ hiển thị thông báo lỗi.

3. Ngăn chặn người dùng khác cài đặt phần mềm mới trên hệ thống

Sẽ phải mất một khoảng thời gian dài để có thể "dọn sạch" được lũ virus và các phần mềm độc hại đáng ghét tấn công trên máy tính của bạn khi cài đặt bất kỳ phần mềm nào. Do đó để đảm bảo an toàn cho hệ thống cũng như đảm bảo người dùng khác đăng nhập trái phép và cài đặt các phần mềm, chương trình có nhiễm các phần mềm độc hại trên máy tính của mình, bạn nên vô hiệu hóa Windows installer trên Group Policy đi.
Trên cửa sổ Group Policy bạn điều hướng theo key:
Computer Configuration => Administrative Templates => Windows Components => Windows Installer
Ngăn chặn người dùng khác cài đặt phần mềm mới trên hệ thống
Tại đây tìm và kích đúp chuột vào "Disable Windows Installer".
Trên cửa sổ Disable Windows Installer, chọn tùy chọn Enable và chọn Always từ Menu dropdown tại mục Options.
Trên cửa sổ Disable Windows Installer
Từ giờ người dùng khác không thể cài đặt bất kỳ phần mềm mới nào trên máy tính của bạn, mặc dù họ có thể tải và lưu trữ ứng dụng đó trên máy tính.

4. Vô hiệu hóa truy cập các thiết bị lưu trữ di động

Các thiết bị lưu trữ di động như USB, hoặc các thiết bị khác khá là hữu ích để sao chép và lưu trữ dữ liệu, nhưng tuy nhiên đây cũng có thể là một trong những “con đường” để virus tấn công máy tính của bạn.
Nếu ai đó vô tình (hay cố ý) kết nối một thiết bị lưu trữ có nhiễm virus với máy tính của bạn, virus có thể tấn công toàn bộ hệ thống máy tính của bạn và gây ra một số vấn đề nghiêm trọng trên máy tính.
Để chặn người khác kết nối các thiết bị lưu trữ di động trên máy tính của bạn, trên cửa sổ Group Policy bạn điều hướng theo key:
User Configuration => Administrative Templates => System > Removable Storage Access => Removable Disks: Deny read access
Vô hiệu hóa truy cập các thiết bị lưu trữ di động
Tại đây bạn tìm và kích đúp chuột vào "Removable Disks: Deny read access".
Trên cửa sổ Removable Disks: Deny read access, click chọn Enable để kích hoạt tùy chọn và máy tính của bạn sẽ không đọc bất kỳ dữ liệu từ thiết bị lưu trữ ngoài (chẳng hạn như ổ USB,…). Ngoài ra trên cửa sổ Group Policy có một tùy chọn bên dưới có tên  "Removable Disks: Deny write access". Bạn có thể kích hoạt tùy chọn nếu không muốn bất kỳ ai ghi (dán) dữ liệu vào thiết bị lưu trữ ngoài.
Trên cửa sổ Removable Disks: Deny read access

5. Ngăn một ứng dụng cụ thể đang chạy

Ngoài ra Group Policy còn cho phép người dùng tạo một danh sách các ứng dụng để ngăn chặn các hoạt động của các ứng dụng này.
Để làm được điều này, trên cửa sổ Group Policy bạn điều hướng theo key:
User Configuration => Administrative Templates => System => Don’t run specified Windows applications
Ngăn một ứng dụng cụ thể đang chạy
Tại đây bạn tìm và mở tùy chọn "Don’t run specified Windows applications".
Trên cửa sổ Don’t run specified Windows applications, click chọn Enable để kích hoạt tùy chọn và click chọn Show để bắt đầu quá trình tạo một danh sách ứng dụng mà bạn muốn chặn.
Trên cửa sổ Don’t run specified Windows applications
Để tạo danh sách, bạn phải nhập tên thực thi của ứng dụng kèm theo .exe để có thể chặn ứng dụng, chẳng hạn như CCleaner.exe, CleanMem.exe hoặc lol.launcher.exe.
Cách tốt nhất để tìm chính xác tên thực thi của ứng dụng là tìm thư mục ứng dụng trên Windows File Explorer, sau đó sao chép chính xác tên thực thi của chương trình (có phần đuôi mở rộng là ".exe").
Nhập tên thực thi vào danh sách rồi click chọn OK để bắt đầu quá trình chặn ứng dụng.
Ngoài ra trên cửa sổ Group Policy còn có tùy chọn Run only specified Windows applications. Nếu muốn vô hiệu hóa tất cả các loại ứng dụng, trừ một số ứng dụng quan trọng, bạn có thể sử dụng tùy chọn để tạo một danh sách các ứng dụng mà bạn muốn chặn.

6. Vô hiệu hóa Command Prompt và Windows Registry Editor

Command Prompt trên Windows cho phép bạn nhập những câu lệnh để máy tính thực hiện lệnh đó và truy cập hệ thống. Tuy nhiên các hacker có thể dùng lệnh Command Prompt (CMD) để truy cập trái phép những dữ liệu nhạy cảm.
Cả Command Prompt và Windows Registry Editor là những công cụ có thể vô hiệu hóa mọi hoạt động trên máy tính Windows, đặc biệt là Windows Registry Editor.
Nếu muốn đảm bảo an toàn cũng như các vấn đề bảo mật trên máy tính của mình, bạn nên vô hiệu hóa Command Prompt và Windows Registry Editor đi.
Để làm được điều này, trên cửa sổ Group Policy bạn điều hướng theo đường dẫn:
User Configuration => Administrative Templates = > System
Tại đây bạn tìm và kích đúp chuột vào các tùy chọn có tên "Prevent access to the command prompt" và "Prevent access to registry editing tools". Sau đó trên cửa sổ Prevent access to the command prompt và cửa sổ Prevent access to registry editing tools bạn click chọn Disable để vô hiệu hóa các tùy chọn này đi.
Tại đây bạn tìm và kích đúp chuột vào các tùy chọn có tên "Prevent access to the command prompt" và "Prevent access to registry editing tools
Từ giờ người dùng khác không thể truy cập Command Prompt và Registry Editor nữa.

7. Ẩn phân vùng ổ đĩa từ My Computer

Nếu một ổ đĩa cụ thể nào đó trên máy tính của bạn có chứa dữ liệu nhạy cảm và bạn không muốn người dùng khác truy cập và đánh cắp các dữ liệu đó, khi đó bạn có thể ẩn ổ đĩa đó từ My Computer và người dùng khác không thể tìm được chúng.
Để làm được điều này, trên cửa sổ Group Policy bạn điều hướng theo đường dẫn:
User Configuration => Administrative Templates => Windows Components => Windows Explorer => Hide these specified drives in My Computer
Ẩn phân vùng ổ đĩa từ My Computer
Tại đây tìm và kích đúp chuột vào tùy chọn có tên "Hide these specified drives in My Computer".
Trên cửa sổ Hide these specified drives in My Computer click chọn Enable để kích hoạt tùy chọn.
Sau khi kích hoạt tùy chon, từ menu dropdown mục Options, chọn ổ mà bạn muốn ẩn. Cuối cùng click chọn OK để ẩn ổ đó trên hệ thống.
Trên cửa sổ Hide these specified drives in My Computer click chọn Enable để kích hoạt tùy chọn.

8. Tinh chỉnh Start Menu và thanh Taskbar

Group Policy cung cấp cho bạn hàng tá các tinh chỉnh cho Start Menu và thanh Taskbar theo ý muốn của bạn. Các tinh chỉnh này có sẵn cho cả Admin và người dùng thường.
Để tinh chỉnh Start Menu và thanh Taskbar, trên cửa sổ Group Policy Editor bạn điều hướng theo đường dẫn:
User Configuration => Administrative Templates => Start Menu and Taskbar
Tại đây bạn sẽ tìm thấy tất cả các tinh chỉnh kèm theo các giải thích.
Các tinh chỉnh khá là dễ hiểu. Bên cạnh đó Windows còn cung cấp mô tả chi tiết cho mỗi tinh chỉnh.
Bạn có thể thực hiện một số thao tác như thay đổi chức năng nút Power trên Start Menu, ngăn người dùng ghim chương trình trên thanh Taskbar, hạn chế tìm kiếm trên tùy chọn Search, ẩn thông báo trên khay hệ thống, ẩn biểu tượng pin, ngăn việc thay đổi thanh Taskbar và thiết lập Start Menu, ngăn người dùng sử dụng các tùy chọn Nguồn (tắt máy, chế độ ngủ đông (hibernate),…), gỡ bỏ tùy chọn Run khỏi Start Menu,….
Tinh chỉnh Start Menu và thanh Taskbar

679.0 Hướng dẫn cài đặt AD RMS server ( Active Directory Rights Management Services) có trong Windows Server 2012.

Nguồn: https://mdungblog.wordpress.com/2018/06/21/simple-guide-huong-dan-cai-dat-ad-rms-windows-server-2012-r2/   Hôm nay mình xin giới thiệ...